Saturday, December 16, 2017

Some old creations


Hi there!

I thought it was about time i did some posting here again. I have some creations i have not blogged before and i felt the need to update my blog. 

Recently i have been occupied with other stuff and my crafting has been porly neglected. I really hope i will find time to create something soon. In the meanwhile here is some previous stuff not published before.


This summertag i created for a challenge at ArJo`s Tag & ATC kos. Here i have used a TH stencil with distress ink and graded the colours to create the sunbeams. I also stamped the tag with some butterflies and a dragonfly, with flowers. I also used a flowerstencil with white paint, as you can see in the bottom of the tag. I really love the colours and how it turned out.


These next creations are also for an ArJo`s challenge. It is an ATC series of acetate. I had so much fun creating these. They are a bit different than my usual ATCs. I just wanted to do something special and this is the result. 


Since i couldn`t use heatgun on the acetate it took me a while to get them dried. but it was so worth the waiting. My strongsuit is NOT patience....just sayin`, lol.


Here is today`s last creations for you.
Also for the same challenge.


Here i have used gellatos on watercolour cardstock. Just smearing the colours all over. Next i stamped with several stamps. I then glued on the images and shaded around them. I finished off with some text and voila....finished!

I hope you are having a wonderful time and enjoy the Christmas spirit. I have a week vacation now and I`m trying to put some Christmas mood into my family. I hope i find the time to post something real soon. Thanks for stopping by. Allways appreciated.


Tuesday, June 6, 2017

ATC swap series

Hi everyone!

I`m back with some ATC`s i created for a swap a while back. The theme was collage and these are what i came up with.


It was essential that the ATC`s looked like part of a series. So i used the same colours and elements, but i changed the images and placing of elements so they wouldn`t look exactly the same.

I`m sorry the pics aren`t the best. I was in a bit of a hurry to get them posted within the deadline....yeah...that`s me....Last Minute Eidhammer is my name, hahaha.


I`ve posted closeups of all the ATCs. I have to say i was a bit satisfied with these. Love how the colours came out. And i had so much fun making them.


I hope you like my ATCs. Love to see you back here soon,

Saturday, June 3, 2017

In these confirmation times....

Hello sweets!

Today i`m gonna show you a couple confirmation cards i`ve created. It`s nothing fancy, just clean and simple....ok...my kind of simple anyway, lol. Weeell the first one at least, lol. 


For this first card i have only used DP from Pion Design. On the image i sprinkled some white enamel from Stampendous and gave it a little round with the heatgun.


I have put a piece of cardstock behind the picture to raise it a bit from the surface and then added some beadstring around it.


The roses are from Kort & Godt while the metal swirl is from Korthobby.

This next one is not so CAS as i wished for, hahaha....Well, anyway....i made a card, lol. I actually don`t remember what paper it is, so if anyone knows, feel free to send me a little note. Appreciate that a lot.


The chippie i just kept plain. I added some lace and some flowers with a ribbon behind them. To finish it off i added a sentiment.


Look at this yummy gorgeous glitter on the rose. I just love it. 


Hope you all are enjoying your weekend. Thanks for visiting.


Friday, May 5, 2017

Colour Swatch

Hi peeps!

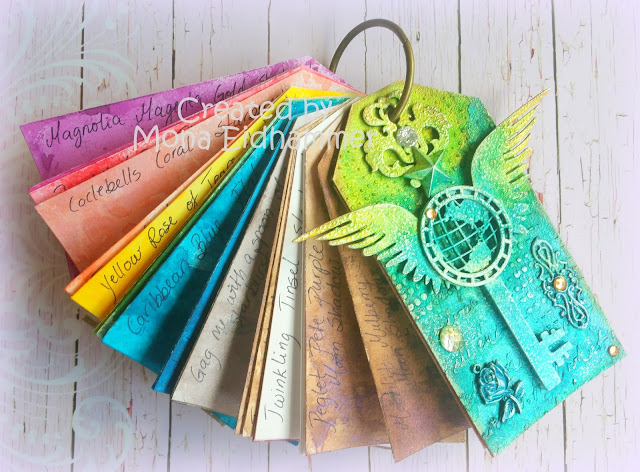
I have FINALLY gottn around to create a colour swatch. I thought it was a bit unnessesary to test all the colours each and every time i had to use one. Just because i didn`t remember what the colours look like, lol. Talk about spending colours on nothing... huh. Well, not any more.


Of course i had to create covers for it as well. I have found myself a new supplier of chipboard, Boozybear. Looove these designs. Please do check them out if you love steampunk designs. Her shop is here


I have cut out a couple of tags from chipboard. Sized them a bit bigger than the swatches. For texture i used a couple of stencils with some modellingpaste. Glued on the chippies and metal pieces. Next i painted it all with white gesso before i started spraying my colours. Here i have used 3 different kinds of colour. To finish it off i put on a touch of silver paste just to make the pattern pop and also some bling.

Now i never have to try all the colours to find the right one, any more....yey.

Hope you liked my project today. Love to see you back soon.

Tuesday, April 25, 2017

CAS ATC

Hi everyone!

I`m back after a week up north, visiting my parents as well as attending a crop. What a girl doesn`t do to get some crafting companions, lol.... just travel 560 miles for it, hahaha. Talk about being crazy. Anyway....i had an awesome time. We had so much fun and were very creative. Looking forward to next time. 

Today i want to show you a series of ATCs i recently created. ArJo`s Tag and ATC kos on facebook arranges challenges each month to challenge us in different techniques. Last month the theme were CAS...or as close as possible. In addition to the theme, we had to use at least a newspaper-clipping, two colours and a stamp. And here is my take on the challenge:


I think this is as CAS i can get it, lol. For those of you that don`t know what CAS means: Clean and simple.

I have gotten hooked on washitape recently. Maybe because i have purchased "My Prima Planner" and washitape is a great way to decorate it lol. Anyway....I ordered these totally adorable kittens online. Just looove them. They are sooo cute... or so i thought until i sat down editing these pics. Then i noticed one of them are mooning us, hahaha. What a naughty little bugger hahaha. Not so cute after all or what?


I had to show you these from another angle just to show you the gorgeous foil detail on the washitape.

The colours show up a bit off. The yellowish colour is actually more of a lime colour. The top pic looks more than the real thing.


To get this look i used a stencil and modelling paste with two colours of Gellatos. I added my embellies and spritzed with black, white and gold specs of colours.

Thanks for taking the time to stop by today. Allways much appreciated.

Monday, April 17, 2017

A new creation....actually

Hi there everyone!

I`ve actually got a NEW creation in store for you today. It`s a mixed media layout of my eldest daughter. She was in a bit of a crazy, funny mood when she took this selfie. Of course i had to use this for my layout as i thought it was kinda cool. 

I started off with some modelling paste and a checker stencil. Next i used a stencil with numbers and some viva decor copper paste. For the spraying i used sprays from Lindy`s Stamp Gang. The final stencil i used is the leafy one, which i combined with distress ink, spiced marmelade.


When all the mediums had dried i stamped some text and a poststamp in random order. For the final touch on the background i used a cap of one of the spray bottles to "stamp" small circles of white gesso randomly. When finished with the background i started prepping the metal. I coated the metal with white gesso and then painted them with blue metallic blended with black, for the right shade.


Next task was to emboss the chipboardpieces. I have used embossingpowder from Lindy`s and Stampendous. I just love the blue shimmery colour of the arrow/feather piece. It doesn`t show too good on this pic but i promise it`s lovely.


I thought the sentiment was a bit describing for the mood in which the pic was taken, so i just had to use it. This piece was embossed with enamel from Stampendous. Here i have used Ivory. I just love the gold specs in it. 


The photo was matted with a designpaper and a white paper using chipboard to make a more layered effect. I also added some playingcards just for the fun of it.


For some last finishing touches i have added a few flowers, some metal stars and some bling. And then splattered with black and white gesso as well as the two colours used on the background. 

That`s it for this time. Hope to see you back here soon.


Sunday, April 9, 2017

Tag-Steampunk card.

Hi there everyone!

Are you ready for the easter holidays? I`m nearly getting there. Just a few hours at work tomorrow and then i`ll have 13 days off from work. I can really need them now, lol.

So lets just get down to buisness. I have attended several classes with Yasmin Tölche. And this card is from one of them.


This is a card created by folding a large tag (size 12 i believe) in half. As usual we created lots of layers to create more of a 3D effect. We started off with several layers of designpaper. We cut out a lot of ephemera from one of the DP`s of Graphic 45 to use as embellishments on the card. The white wings and the large cog in the background is embossed with several layers. 


Before the embellishing we used some twine to keep some of the layers together. Next we started building the layers of embellishments. The metal heart is coloured with a red ProMarker. (Poppy)


To finish it off we glued on some microbeads and metal cogs. The bow is coloured with inks from Lindy`s Stamp Gang mixed together to get this dirty greenish look. 

Hope you like the card. Thanks for visiting me today. And....


Thursday, April 6, 2017

Rainbow card

Hey peeps!

Today i just want to show you a quick and easy card i created a while ago. I`m so bad at blogging my creations. Shame on me, lol.

This is a CAS one. I`m not that comfortable making cas cards but i liked the idea of this one.


I was challenged to go out of my comfort zone and create something using the colours of the rainbow and this is what i came up with. The feathers are created wit paperclay and molds. I used my ProMarkers to colour them in the colours i needed. I then adhered them to a double-paneled card. To finish it off i added some stickles on the edge of the panels and added a sentiment.


Tuesday, April 4, 2017

Steampunk bag`n tag card.

Hi everyone!

I while back i attended a class by Yasmin Tölche. We were creating a steampunk bag`n tag card. That`s a paperbag-card with a tag inside. I had so much fun doing this. I just love all the layering. I have learned a lot from Yasmin. She is so creative and energetic and so much fun to be around. Thanks for beeing such an inspiration Yasmin. 

Well, you probabely want to see the card... so here it is.


Isn`t it cool? I just absolutely love it. Papers used are from Graphic 45....i think. If not, you have to arrest me on that, lol. The stamp, i do not know what brand it is, sorry.  But the chipboard gears are Sizzix bigz dies. These are covered with 3 different colours of embossingpowder which gives them this cool rusty effect. 


The pieces is adhered in several layers to make this 3D effect. You can use 3d glue dots or just cut out som old chipboard-pieces. Old boxes makes grate 3D effect so don`t throw away your old cardboard-boxes. It`s a great way to do some recycling. 


The metalpieces are mostly from Tim Holtz and Korthobby.

Thanks for stopping by today.

Thursday, February 16, 2017

Valentine tag.

Hi peeps!

Hope you all had a wonderful valentines day. I however did not. Both i and my hubby was working the late night shift so we just`ll have to do a mini valentines in the weekend. I`m a busdriver and driving downtown i could see all the well dressed couples...the man with the flower in one hand and his girl in the other....oh i`m a hopeless romantic, it`s soooo nice to see all the love.

Anyway....in regard of valentines i have created a little tag.  


I have used mainly Prima products on this one. All papers are from the Rossibelle collection. 

I took a craft tag and cut out my papers to size. I then layered the smaller papers with a chipboard piece to get a more dimension. I enhanced the hole with a reinforcer from the Prima planner line by Frank Garcia. I think they are so gorgeous and glittery, lol. Looove all glittery stuff. I then fussy cut a heart. I used a stencil with glue to get a little bit of pattern and then used some foil to get the chiny effect you can se on the pic below. I just love how it turned out. 


I also fuzzy cut the sentiment from one of the papers and adhered it under the frame, which i made using paper clay. Next i put some cheesecloth in between the layers and embellished with a ribbon and flowers from Prima and WOC. 


For the finishing touches i added some bling, liquid pearls and a dragonfly, also made of paper clay. The frame and dragonfly got a little coat of Acrylic paint from Finnabair Opal Magic line. I used the Rose/gold one, Love the subtile shimmery look and how it makes the detail come forth a bit.

 Challenges entered:

Noor Design - Have a heart
Hjerteboden - Love/Kjærlighet
Papirplaneten - Love/Kjærlighet

Related Posts with Thumbnails