Showing posts with label 3D. Show all posts

Friday, May 5, 2017

Colour Swatch

Hi peeps!

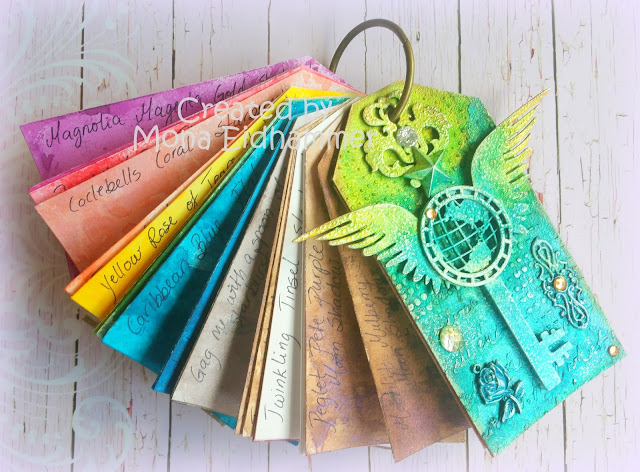
I have FINALLY gottn around to create a colour swatch. I thought it was a bit unnessesary to test all the colours each and every time i had to use one. Just because i didn`t remember what the colours look like, lol. Talk about spending colours on nothing... huh. Well, not any more.


Of course i had to create covers for it as well. I have found myself a new supplier of chipboard, Boozybear. Looove these designs. Please do check them out if you love steampunk designs. Her shop is here


I have cut out a couple of tags from chipboard. Sized them a bit bigger than the swatches. For texture i used a couple of stencils with some modellingpaste. Glued on the chippies and metal pieces. Next i painted it all with white gesso before i started spraying my colours. Here i have used 3 different kinds of colour. To finish it off i put on a touch of silver paste just to make the pattern pop and also some bling.

Now i never have to try all the colours to find the right one, any more....yey.

Hope you liked my project today. Love to see you back soon.

Sunday, April 9, 2017

Tag-Steampunk card.

Hi there everyone!

Are you ready for the easter holidays? I`m nearly getting there. Just a few hours at work tomorrow and then i`ll have 13 days off from work. I can really need them now, lol.

So lets just get down to buisness. I have attended several classes with Yasmin Tölche. And this card is from one of them.


This is a card created by folding a large tag (size 12 i believe) in half. As usual we created lots of layers to create more of a 3D effect. We started off with several layers of designpaper. We cut out a lot of ephemera from one of the DP`s of Graphic 45 to use as embellishments on the card. The white wings and the large cog in the background is embossed with several layers. 


Before the embellishing we used some twine to keep some of the layers together. Next we started building the layers of embellishments. The metal heart is coloured with a red ProMarker. (Poppy)


To finish it off we glued on some microbeads and metal cogs. The bow is coloured with inks from Lindy`s Stamp Gang mixed together to get this dirty greenish look. 

Hope you like the card. Thanks for visiting me today. And....


Tuesday, April 4, 2017

Steampunk bag`n tag card.

Hi everyone!

I while back i attended a class by Yasmin Tölche. We were creating a steampunk bag`n tag card. That`s a paperbag-card with a tag inside. I had so much fun doing this. I just love all the layering. I have learned a lot from Yasmin. She is so creative and energetic and so much fun to be around. Thanks for beeing such an inspiration Yasmin. 

Well, you probabely want to see the card... so here it is.


Isn`t it cool? I just absolutely love it. Papers used are from Graphic 45....i think. If not, you have to arrest me on that, lol. The stamp, i do not know what brand it is, sorry.  But the chipboard gears are Sizzix bigz dies. These are covered with 3 different colours of embossingpowder which gives them this cool rusty effect. 


The pieces is adhered in several layers to make this 3D effect. You can use 3d glue dots or just cut out som old chipboard-pieces. Old boxes makes grate 3D effect so don`t throw away your old cardboard-boxes. It`s a great way to do some recycling. 


The metalpieces are mostly from Tim Holtz and Korthobby.

Thanks for stopping by today.

Thursday, February 16, 2017

Valentine tag.

Hi peeps!

Hope you all had a wonderful valentines day. I however did not. Both i and my hubby was working the late night shift so we just`ll have to do a mini valentines in the weekend. I`m a busdriver and driving downtown i could see all the well dressed couples...the man with the flower in one hand and his girl in the other....oh i`m a hopeless romantic, it`s soooo nice to see all the love.

Anyway....in regard of valentines i have created a little tag.  


I have used mainly Prima products on this one. All papers are from the Rossibelle collection. 

I took a craft tag and cut out my papers to size. I then layered the smaller papers with a chipboard piece to get a more dimension. I enhanced the hole with a reinforcer from the Prima planner line by Frank Garcia. I think they are so gorgeous and glittery, lol. Looove all glittery stuff. I then fussy cut a heart. I used a stencil with glue to get a little bit of pattern and then used some foil to get the chiny effect you can se on the pic below. I just love how it turned out. 


I also fuzzy cut the sentiment from one of the papers and adhered it under the frame, which i made using paper clay. Next i put some cheesecloth in between the layers and embellished with a ribbon and flowers from Prima and WOC. 


For the finishing touches i added some bling, liquid pearls and a dragonfly, also made of paper clay. The frame and dragonfly got a little coat of Acrylic paint from Finnabair Opal Magic line. I used the Rose/gold one, Love the subtile shimmery look and how it makes the detail come forth a bit.

 Challenges entered:

Noor Design - Have a heart
Hjerteboden - Love/Kjærlighet
Papirplaneten - Love/Kjærlighet

Saturday, February 11, 2017

Happy birthday

Hi everyone!

I created a birthday card for a friend of mine recently. I`ve been inspired by Yasmin Tölche and her lots of layers kind of style. So i created a shabby chic, layered card. I tried to use some of my scraps for this one. I`m sorry to say i don`t have any more closeups as it all went so fast that i only managed to take this one pic of the card. Not a very good one though but it`ll have to do. I think this must be the fastest card i ever made. Only used an hour and 10 mins. And it has to be a record, lol. Still i was quite pleased how it turned out. And most importantly...Hilde loved it as well. Mission accomplished, lol.


Thanks for stopping by.

Saturday, October 8, 2016

Kurs med Randi Thorsen

Good morning peeps!

I`m back here to show you a box i made lat year. Yeah i know....way overdue, lol. I was attending a class held by Randi Thorsen, a well known crafter in the Norwegian crafting community. Looove her stuff. And i`m so pleased i got to meet her.


You might recognize her style in my box. I think it turned out quite well. 


I just love how much the pearlstrings makes the whole box. It would definately not have been the same without it.


All flowers are from I am Roses.

Thanks for the visit. See you soon.


Monday, September 26, 2016

Shabby chic candy jar

Hi there everyone!

Today i want to show you a candy jar i have altered. My oldest daughter came to me wondering if i could help her make a birthday present for her best friend. And i just couldn`t say no. She has never asked me to create something for her, so the pressure to make something extraordinary layed heavy on my shoulders, lol. But i was very proud to be asked. So i just had to get started.

She had this empty candy jar she wanted med to turn into something nice. I`m sorry byt i forgot to take pics before i started but i have LOTS of pics of the end result, lol. So i just have to warn you that this is a picture heavy post. 


A while back i purchased some vintage ephemera print outs on Etsy from a company called By Digital Paper. She has a lot of gorgeous ephemera. And for this jar i used the Sweet Angel bookmarks


 I decoupaged the paper to the jar and glued on the bling strips in between the sheets.


Aren`t these totally adorable? I just looove these images. 


On the top of the jar i cut out the centre of a doily to make place for the handle. I then adhered it to the top. 


Next i put on a lot of trims around the jar and the top. 


To finish it off i put on a lot of different flowers, a resin element and a charm.


As a last touch i gave the flowers a little touch with some glitter glue.


Thanks for visiting me today. Hope to see you back here soon.


Saturday, August 27, 2016

Coin envelope mini-album

Hi everyone!

Today i would like to show you a minialbum i created for a sweet friend in the states. There is a lot of pics in this post, but i hope you will stick around anyway, lol.

These days coin-envelopes are hard to get a hold of here in Norway, so i have improvised a bit. My friend Martica, made me a mini-album recently and i copied her take on these envelopes. (Btw it`s absolutely gorgeous the mini i received.)

Hope you like the mini i created. Here we go.


On the cover i have used Prima papers, Nature`s Garden collection while the papers are all from the Tea-Thyme collection. 


You can see a chipboard piece from Dusty Attic on the front. This i have left plain, only used clear wink of stella on it to make it glittery. The effect is just gorgeous. You can see it at bit better on the image below. The flowers are from Prima, Petaloo, Kort og Godt and Storyteller.


I also used Wink of Stella on the wood piece from Kaisercraft. The white frame is created from paperclay using a mold.


This is the first time i have made use of my bind it all without help. And i think i got hang of it fairly quick. So i might just have to start creating more mini abums, lol. I can`t just let it stay on my shelf collecting dust either, hahaha.


For decoration, i created a charm using glass beads and an wing and also some metal decor. Love how it turned out. 


Tags for pictures. I wanted to have as many possibillities for pics as possible.


Pages with flaps to have space for pics or journaling.


All the flaps has magnetic lock to keep them in place.


I wanted to keep the album fairly simple as the pages are so decorative themselves. Also i wanted to keep the space free to be able to place pics in a nice way. There is plenty of space to decorate after pics are placed.


I was originally making an other album but i managed to muck it up totally. The binding was completely wrong. And the pages looked weird. But i`m happy anyway, course i got to create this lovely piece instead. I had a hard time sending it to the States as i liked it so much myself. But i`m happy i did, course the lady who received it was overwhelmed by it. And i`m sooooo so happy she liked it.

Hope you like it as well. Thanks for stopping by. I really appreciate it.

Some of you might notice that i have changed settings on my blog. I have removed the Google + connection to make it easier to comment. I have noticed that i allmost never got any comments on my posts and here the other day a lady told me that i should remove Google + as not many were using it. That`s why my comment section has been rather slim. I was not completely aware of the fact but now i have changed it, so i hope i get more comments now. I`m a bit slow you see, hahaha.


Related Posts with Thumbnails