Tuesday, May 31, 2016

ArJo`s Tag & ATC kos

Hi there everyone!

I`m joining in a little challenge on Facebook by ArJo`s Tag & ATC kos
This month Marianne Johansson is the guest designer and she has set the theme this time. Theme set is M - for Maling or in english, P for Paint. 

We have to have a painted background and somekind of stamping and/or stenciling. All with paint.

Here is my take on the challenge.


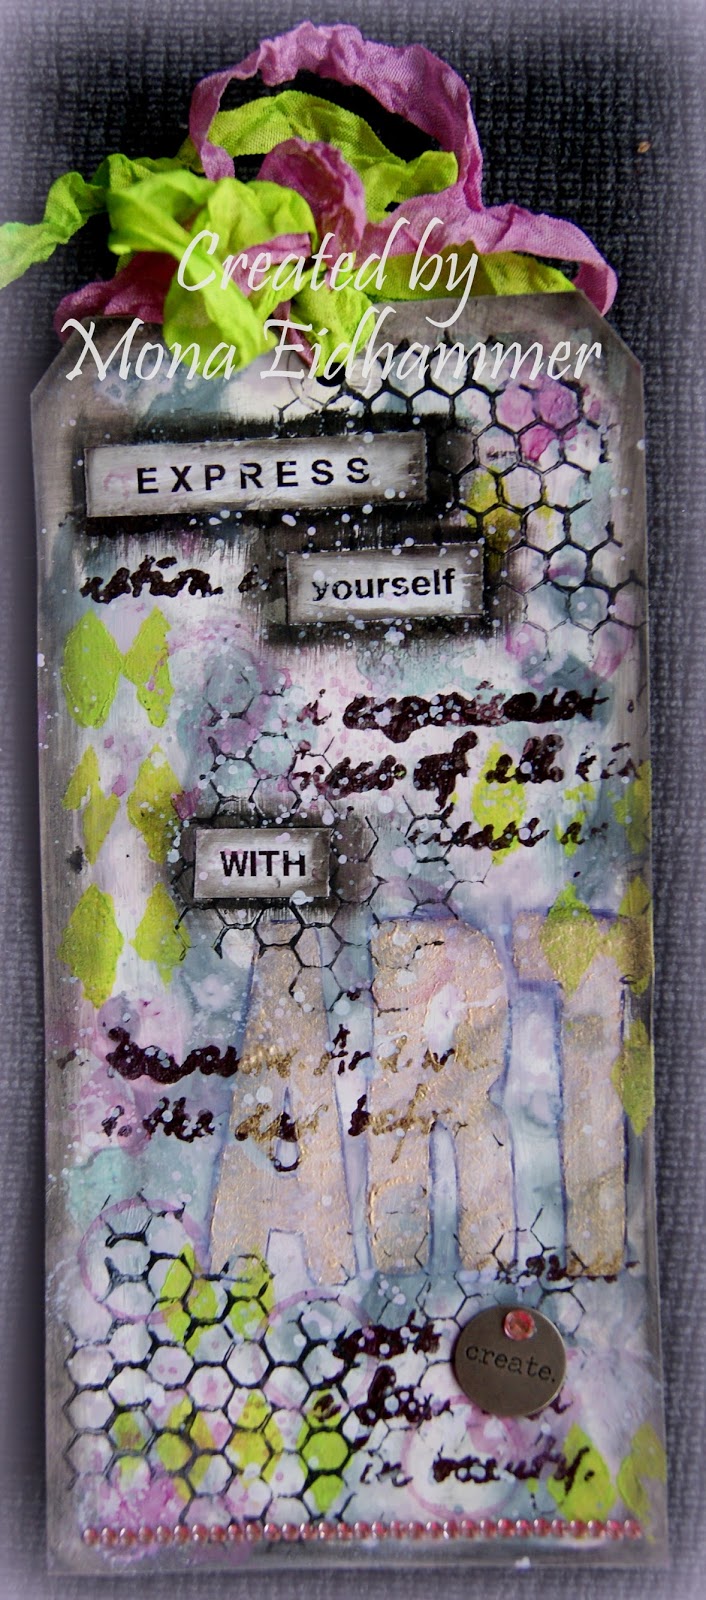
I started off by painting the whole tag with white gesso. Next i started dabbing spots with Distress Paint (Milled lavender and Weathered wood) sprayed with water to make it run easier. Then i just held it different angles to get the paint blended. Then dried it with my heat gun. I then dabbed some extra spots here and there and dried it.


I then used Art Alchemy Opal Magic and Metallique Acrylic paint together with some stencils to create patterns. Stencils i used are Mini Harlequin, Mini Viva la art and Mini Complicated hearts. All by The Crafters Workshop. I also stamped a honeycomb pattern using black gesso. 


I also used some shimmerz spritz (Plum pudding) to get some pink spots. I also used the top of the bottle to dip into the spritz to make circles. Finally i splatted some paint here and there. Here i have used White gesso plain, white gesso blended with Plum pudding spritz and Weathered wood distress paint. 


I used my Dymo to make the text strips. To make it darker and more dramatic i used black gellato and rubbed it around the text and the edges. Around the ART text i used a gel pen course i didn`t want to muck it up too much.


To finish off my tag i coloured up some seambinding to match my tag. For this i used Plum pudding spritz for the pink one and Luminarte H2O Key Lime paint for the green one. I then added some bling and the metal medal from Tim Holtz.

If there is anything you would like to know about the creative prosess, don`t hesitate to ask. I will help as best as i can.

Thanks for visiting me today.


Thursday, May 26, 2016

Confirmation cards

Hi there!

Just popping in to show you a couple of confirmation cards i did on commission.


I believe all the paper used are from Kort & Godt. Please arrest me if i`m wrong. I accidentally tossed away the strip that had all the information so i don`t exactly remember, lol. And there it was again.....senile, lol


I don`t like the light. The pics were taken outside in daylight but i think they turned out too blue-ish. But the colours should be white / light grey.


I think these finished cutout pics are so cool. And they are perfect to use on boy cards. What i love about these papers is that all the elements you need to make a card, are all there. You have the paper, the image and the sentiment. This is awesome. 


This makes it super easy to make a card in a hurry.


Thanks for stopping by today. I wish you all a great weekend.

I`m entering these in Papirdukkene`s challenge - Anniversary


Friday, May 13, 2016

Vintage tag swap - The Bicycle tag

Hi everyone!

I`m sorry for keeping you waiting. I`ve been struggling with a heavy migrain the last couple of days, and it put me out entirely. But now i`m ready to blog my last tag for this swap.

This one is the bicycle tag.


I have aimed for a french feel on this one. Papers used are from Maja Design. The main paper is toned down using a thin layer of gesso. 


I haven`t done much to the tag itself other than layering my embellies. I think the papers are so beautiful themselves so i just created a cluster of embellies from the middle to the lower part of the tag.


The Eiffeltower is cut out from a thin chipboard and then embossed with shabby blue embossing enamel from Stampendous.


The chipboard pieces is just covered with gesso. And blinged up a bit. 


I added some flowers, a paperclay frame, some ribbon and this gorgeous metal bicycle, I think these small organza flowers are just sooooo adorable. 


For the finishing touch i added a vintage button which i think is really beautiful. 
At the bottom i put on some gorgeous yummy lace and a bling ribbon.

Well....that`s all my tags for the vintage tag swap by Martica. I have received such sweet comments from the recipients and i`m so happy they were pleased with my work. 

I really appreciate your visits. Thanks.
Have a great weekend everyone!


Sunday, May 8, 2016

Vintage tag swap - The vintage typewriter tag

Hi again!

Today i will show you my second tag in the the vintage tag swap i participated in.
This one is the Typewriter tag.


This tag has lots and lots of layers and elements. I`ve tried to use up some of my scraps. I am not too good at using my scraps but throw them away....noooo, no, no, no, lol. So finally i got to make use of some of them. 


The large gears and the wings and crown are chipboard created using the Tim Holtz, Sizzix bigz dies. And then embossed in several layers. The wings turned out so silky and beautiful. Absolutely loooove them. The heart is a silver metal heart which i coloured red with my ProMarkers. I found that the red colour really stands out. 


I got my hands on these cute small glass containers. They are pretty small but makes such a pretty  addition to my creation.


I just wanted to show you a closeup of the gear. I just love how it turned out. I embossed it with three different embossing powders. Silver, copper from Ranger and midnight bronze obsidian from Lindy`s Stamp Gang.

I also love the filligree metal piece. I think it fits beautifully to this tag.


The ephemera is fussycut from a G45 paper.


On this last pic you can see all the different layers. 


To finish off my tag i put on some micro beads from Finnabair and some bling here and there. And finally topped it with some seambinding. It was originally brown but i coloured it with a bright red, allmost orange starburst spray from Lindy`s. And i think the colour looks fabulous.

Hope you like my tag, and tomorrow i will post my last tag. 
Thanks for visiting me today.


Saturday, May 7, 2016

Vintage tag swap - The Vintage dressform tag

Hi there everyone!

A little while ago i participated in a vintage tag swap hosted by my friend Martica over in the states. She allways throws such fun and fabulous swaps. I`m not allways able to join in but this time i had some spare time to join. There is a lot of pics so i will post the three tags in separate posts.

First post up is the Vintage dressform tag. 


I used a large manila tag #10 and covered it with papers from Maja Design, Vintage Summer Basics.
The chipboard frame is embossed with white embossing and while still warm i sprinkled some pink micro beads onto it so it would adhere in the embossing enamel. I was really happy about how it turned out. This frame is a bigz dies from Sizzix.


I left the dressform-chippie plain as i thougt it was the right look for this tag.


 As i assembled the tag i used some digital tags i bought online from a company called "By Digital Paper". They have so much gorgeous shabby chic/vintage digital ephemera and stuff :-) You can see them behind the dressform stamped image. (The ones with the bird and the flowers.)


A little tip for you all. When you want to make some space between all your layers, it is great to use scraps of chipboard instead of the expensive foam tape. When i buy chipboard i allways save the scraps so i can use them behind images or other embellishments. So it`s a great way to create some dimension to your project. It also makes your project more sturdy. 

Thanks for taikng the time to visit. Hope you liked my first tag. Stay tuned and tomorrow i will show you the next tag i have created for this swap.


Sunday, May 1, 2016

Scraplifting Marta Lapkowska

Hi there everyone!

I hope you are having a wonderful weekend out there. I`m sitting here blogging and looking out on the fantastic weather. The sun is shining and it is a whopping 13 degrees. It`s just a bummer that i have to be close to the toilet today, lol. Anyway i get to blog my recent creation at least.

I little while back i asked Marta Lapkowska if i could get permission to scraplift her "Serenity" ATC series. Luckely she gave me her blessing. I was so happy course i love this series and i love her work in general. She is such a sweetheart and i am so grateful for her dedication to help new and upcoming artists with tips and tricks when it comes to beeing creative.

Well here we go. This first picture is the original from Marta. I just loooove this series. The colours, the design....i just totally fell in love with these the moment i layed eyes on them. And those butterflies are so, so beautiful.


Here is my take on the ATCs. Not nearly as beautiful as Marta`s but  i like the way they turned out. I didn`t have the same colours as the originals so i had to make do with my own stash. It`s funny to see the difference in the green colour as Marta used powder to blend with her paste and i used spray to blend with my paste. We have used the exact same colour and paste but mine turned out lighter than hers.  


Also...i didn`t have blue embossing powder so i had to improvise with dark brown instead. She also used art sugar to create the glittery effect on her details while i didn`t have that. So i used clear embossing powder with different colour of shimmer for the butterflies and added some Clear Wink of Stella on the dots and text. I know it doesn`t show as my lighting was not the best. I really have to get me one of those light tents, lol. 

Below you see some closeups.


Supplylist for my version on the ATCs:

Words from Authentique Petite diction: Pretty

This project was part of a challenge on Facebook in the group of ArJo`s Tag og ATC kos. Where the theme for the challenge was scraplifting.

Just to mention it if you are new to any kind of paperarts: When you "borrow" someone else`s creation in your work. Or if you are inspired by someone in any way, the proper thing to do is to give credit to the person you are inspired by. Either by mentioning their name in your post or even linking up to the actual piece you were inspired by.

With that said. Keep on creating. Meet new friends, help others where you can and give credit when credit is due.

Related Posts with Thumbnails