Showing posts with label Steampunk. Show all posts

Friday, May 5, 2017

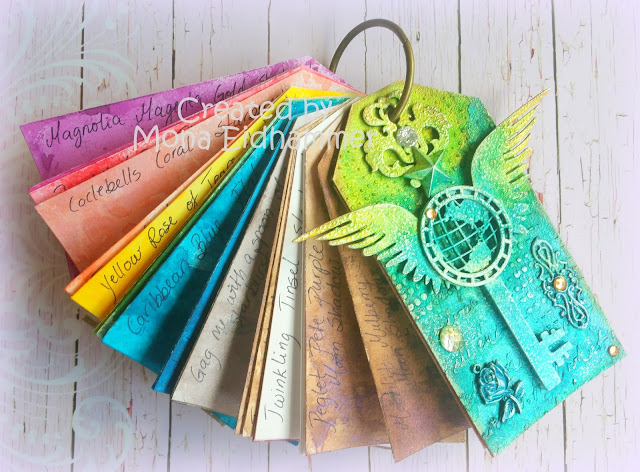
Colour Swatch

Hi peeps!

I have FINALLY gottn around to create a colour swatch. I thought it was a bit unnessesary to test all the colours each and every time i had to use one. Just because i didn`t remember what the colours look like, lol. Talk about spending colours on nothing... huh. Well, not any more.


Of course i had to create covers for it as well. I have found myself a new supplier of chipboard, Boozybear. Looove these designs. Please do check them out if you love steampunk designs. Her shop is here


I have cut out a couple of tags from chipboard. Sized them a bit bigger than the swatches. For texture i used a couple of stencils with some modellingpaste. Glued on the chippies and metal pieces. Next i painted it all with white gesso before i started spraying my colours. Here i have used 3 different kinds of colour. To finish it off i put on a touch of silver paste just to make the pattern pop and also some bling.

Now i never have to try all the colours to find the right one, any more....yey.

Hope you liked my project today. Love to see you back soon.

Sunday, April 9, 2017

Tag-Steampunk card.

Hi there everyone!

Are you ready for the easter holidays? I`m nearly getting there. Just a few hours at work tomorrow and then i`ll have 13 days off from work. I can really need them now, lol.

So lets just get down to buisness. I have attended several classes with Yasmin Tölche. And this card is from one of them.


This is a card created by folding a large tag (size 12 i believe) in half. As usual we created lots of layers to create more of a 3D effect. We started off with several layers of designpaper. We cut out a lot of ephemera from one of the DP`s of Graphic 45 to use as embellishments on the card. The white wings and the large cog in the background is embossed with several layers. 


Before the embellishing we used some twine to keep some of the layers together. Next we started building the layers of embellishments. The metal heart is coloured with a red ProMarker. (Poppy)


To finish it off we glued on some microbeads and metal cogs. The bow is coloured with inks from Lindy`s Stamp Gang mixed together to get this dirty greenish look. 

Hope you like the card. Thanks for visiting me today. And....


Tuesday, April 4, 2017

Steampunk bag`n tag card.

Hi everyone!

I while back i attended a class by Yasmin Tölche. We were creating a steampunk bag`n tag card. That`s a paperbag-card with a tag inside. I had so much fun doing this. I just love all the layering. I have learned a lot from Yasmin. She is so creative and energetic and so much fun to be around. Thanks for beeing such an inspiration Yasmin. 

Well, you probabely want to see the card... so here it is.


Isn`t it cool? I just absolutely love it. Papers used are from Graphic 45....i think. If not, you have to arrest me on that, lol. The stamp, i do not know what brand it is, sorry.  But the chipboard gears are Sizzix bigz dies. These are covered with 3 different colours of embossingpowder which gives them this cool rusty effect. 


The pieces is adhered in several layers to make this 3D effect. You can use 3d glue dots or just cut out som old chipboard-pieces. Old boxes makes grate 3D effect so don`t throw away your old cardboard-boxes. It`s a great way to do some recycling. 


The metalpieces are mostly from Tim Holtz and Korthobby.

Thanks for stopping by today.

Sunday, May 8, 2016

Vintage tag swap - The vintage typewriter tag

Hi again!

Today i will show you my second tag in the the vintage tag swap i participated in.
This one is the Typewriter tag.


This tag has lots and lots of layers and elements. I`ve tried to use up some of my scraps. I am not too good at using my scraps but throw them away....noooo, no, no, no, lol. So finally i got to make use of some of them. 


The large gears and the wings and crown are chipboard created using the Tim Holtz, Sizzix bigz dies. And then embossed in several layers. The wings turned out so silky and beautiful. Absolutely loooove them. The heart is a silver metal heart which i coloured red with my ProMarkers. I found that the red colour really stands out. 


I got my hands on these cute small glass containers. They are pretty small but makes such a pretty  addition to my creation.


I just wanted to show you a closeup of the gear. I just love how it turned out. I embossed it with three different embossing powders. Silver, copper from Ranger and midnight bronze obsidian from Lindy`s Stamp Gang.

I also love the filligree metal piece. I think it fits beautifully to this tag.


The ephemera is fussycut from a G45 paper.


On this last pic you can see all the different layers. 


To finish off my tag i put on some micro beads from Finnabair and some bling here and there. And finally topped it with some seambinding. It was originally brown but i coloured it with a bright red, allmost orange starburst spray from Lindy`s. And i think the colour looks fabulous.

Hope you like my tag, and tomorrow i will post my last tag. 
Thanks for visiting me today.


Sunday, September 6, 2015

Mixed media card with Lindy`s Stampgang Sprays

Hi everyone!

This weekend i have enjoyed the company of allmost 80 crafty chicks at Trøndersaksa in Trondheim, Norway. We had a totally exciting and amazing time together. Such a talented and amazing bunch of girls. We laughed, talked and not to mention.... crafted long into the small hours. I just really didn`t wanted it to end so soon. Thanks girls, for a fabulous time. See you again next year!!!

Allthough we had a lot of fun, we also had to do what we ultimately were there for....crafting! At this point i only have edited the photo`s of this card i`m going to show you. I had started it a couple of weeks before the convention but i have been so stuck. But as stubborn as i am, i hadn`t given it up yet. And finally i got my craft juices flowing, lol. 


Lately i`ve been playing around with some mixed media. I`m so in love with the sprays from Lindy`s Stamp Gang. The colours i have used here is the August limited edition spray set. Such vibrant an lush colours. Don`t know if you can see it, but the shimmer on the red and lilac colours are just amazing! And i love how this turned out. 


I used some Heavy Gesso from Prima, creating some texture using the Tim Holtz flourish and the "Art is" stencil from Crafters Workshop. Next i stamped with the Grunge Harlequin stamp from Visible Image.


The frame is embossed with powders from Lindy`s. Loved how the green shimmer appeared. 


Other products i have used are chipboard from Dusty Attic, metal from Korthobby here in Norway, Bling from Prima, Bo Bunny and Marianne design. The centre piece is made by myself. I was inspired by Gabrielle Pollacco on the heart and wings. These are made from the Martha Stewart paper clay. 


I have also used flowers i recieved in a kit i bought long ago, so i don`t know the manufacturer. But the wood piece is Prima. 


As a final touch i finished it all off with some glass pearls and micro pearls from Prima. 


I hope you liked my card. And if you have any questions just feel free to ask me. I will help in any way i can.

Challenges i`m entering:

613 Avenue Create - Anything goes with option of creating your own challenge using the  chart.


Saturday, October 1, 2011

Miss Mirabelle

Hey Everyone!

I have done a new try on some steampunk but i don`t quite know if i succeeded. I think you`ll have to be the judge of that, lol.

Before i continue with this post i would like to to ask you...I have been mada aware of that it is difficult to enter my site or that it is loading very slow. Can you please leave me a message if you too are having this experience? Thanks for your help.


I`m not sure if it shows too well but i have used a copper metallic pen on some of the details. And i think it looked kinda cool, lol. The image is called "Miss Mirabelle" and it is available in the Crafts and Me Store

The colours i have used for this image are:

Hair:
Black, Cool Grey #5,4,3, Prussian, China blue

Skin:
Saffron, Oatmeal, Tan, Cocoa, slate

Clothes/glasses:
Chestnut; Terracotta, Spice, Slate, Plum,

Wings:
Copper metallic pen, Gold metallic, Powder blue, Arctic blue, Glacier blue (flex-marker)

Other colours used:
Green, Tea green (eyes) Berry red, Shale (lips) Cool grey 3,4,5, black (make-up)


All the papers are from the new collection from Prima called Printery. This fragment i made by gluing the image on the backside of a clear fragment. The image is cut out from one of the sheets in the Prima collection. I just love how it turned out.


This metalflower i have had for a long time. Don`t remember where i bought it, but it is available in silver colour at the Crafts and Me shop.


These cogs are from Tim Holtz. As is the die cut clock.


As you can see of the pic i have painted the bigz die with crackle paint. I have used Rock candy for this one. Afterwards i inked it with Distress ink, Vintage Photo to fill in the cracks and make it look old. Then i dried off the excess ink with a cloth. On the same pic you can see better the copper colour i have used on the details. I also coloured the panel behind the image, in the same colour.


The wings has such a gorgeous mosaic so i covered them with clossy accent so make them look glasslike.

I have just received my first package of Flex-Markers and i used Glacier blue for some spots on the wings and i also coloured the background with it. My goodness what fantastic Markers these are. It`s almost like using a paintbrush only with more control of it. Allmost can`t wait to get my next shipment, lol.

These are the challenges i`m entering:

Crafts 4 Eternity - Challenge #39 Anything goes
Forever night - Freeky friday Challenge #11 Anything goes
4 Crafty Chicks - Challenge #57 Anything goes
Penny`s Paper crafty challenge - Challenge #63 Anything goes
Simon says - Anything goes
Anything goes - Challenge #50 Anything goes
Critter sketch challenge - Challenge #84 Anything goes
Crafty Catz - Challenge #102 Things with wings
Lollipop Crafts - Challenge #50 Anything goes



Tuesday, October 26, 2010

Egenlaget bakgrunn

Hei Bloggere!

(For my foreign readers please use my translation button on the left)

Å lage egne bakgrunner er ikke noe jeg gjør så mye av. Så jeg har prøvd meg på en av Tim Holtz` teknikker. (jada jeg vet det, kommer stadig tilbake til TH, hehe. What can i say? Jeg digger mannen:-)) Han gjør så utrolig mye spennende som er så artig å prøve seg på. Og det som er så fantastisk med denne teknikken er at kreasjonene aldri blir lik uansett hvor mye man prøver.


På denne bakgrunnen har jeg brukt hjemmelaget glimmermist laget av re-inkere og perfect pearls. jeg har brukt fargene aged mahogany, broken china, brushed curderoy og mustard seed. Disse har jeg blandet med aged patina perfect pearls (gullfarven) i mini-mistere fra Ranger.


Først tok jeg ett hvitt, litt glatt papir og sprayet flere flekker av hver farge, og lot de blande seg litt. Dette også for å få noen litt rennende effekter. Disse vises dessverre ikke så godt på kortet. Etter at papiret hadde tørket (brukte hårføneren min for å hurtigtørke det, jeg har ikke en sånn fancy varmepistol, så man tager hvad man haver) svertet jag alle kantene med distress ink, brushed curderoy og deretter stemplet jeg det med et tekststempel fra....ja Tim Holtz, hehe.


Dette vises dessverre ikke så godt men jeg har prøvd å ta et nærbilde av venstre øvre hjørne, hvor det vises best. NB! det er KUN 1 av stemplene jeg har brukt som ikke er fra TH. Og det er stemplet med noter og sommerfuglen på. Dette er et stempel fra Forma Hantverk. Så stemplet jeg rundt alle kantene med et svirvelstempel. Til slutt brukte jeg det blødende hjertet i øvre høyre hjørne. Prøvde å unngå å dekke det til med så mye stæsj.


Til de andre bakpanelene har jeg brukt handlaget papir (ikke av meg). Og til slutt laget jeg nok en bakgrunn til hovedstemplet som er et ordtak fra TH. Denne bakgrunnen laget jeg med samme taknikk som den første men jeg sprayet med noen dråper vann i tillegg for å få små flekker i fagene. Her har jeg også kun brukt brushed curderoy og mustard seed og så til slutt svertet kantene. Jeg har også brukt det samme svirvel-stemplet som på den andre bakgrunnen men med en annen farge. (aged mahogany)


Til pynt har jeg brukt et par steampunk bilder fra The Graphics Fairy. Det var ikke helt med beregning, men jeg synes effekten med at hånden kommer ut av det mørke hullet i siden var litt artig. Det eneste jeg synes er litt synd er at jeg ikke klarer å få fram skimmeret i kortet.

Dette kortet skal leveres i disse utfordringene:

Kort O Mania - Utfordring #26 Bruke minst 5 stempler på forsiden av kreasjonen
Nordsalten Hobbyklubb - Utfordring #16 Selvlaget bakgrunn
Oldie But a Goodie - Challenge #4 Add a butterfly
The Three Muses - Things with wings
The Wild Flower Patch - Challenge #37 All twined up
Alphabet Challenge Blog - Z for zig zags
Crafty Emma`s Store Challenge - Buttons and bows
The Stamp Man - Challenge #8 Cards for men
Sukkersøtt - Utfordring #98 Metallpynt
The Tuesday Throwdown - Challenge #23 Sentimentally yours
Flutterby Wednesday - Challenge #127 Open challenge with a butterfly, fairy or an angel on it.
Related Posts with Thumbnails