Showing posts with label Make it Crafty. Show all posts

Wednesday, October 7, 2015

Entering the World Scrap Battle & Tournament

Hey peeps!

Finally i can reveal the creations i made for The World Scrap Battle and Tournament

There are 5 categories in the tournament and i have entered in 4 of them. Layout, card, alter and mixed media. I will post the creations one at a time over the next four days. Starting with my alteration.

The inspiration we were given for the first challenge is this picture:


I have altered a large clothespin
I was inspired by the colours of the banner of the photo. Since this happening is going on in Sweden i decided to go for the colours of the Swedish flag, blue and yellow as you also can find in the pic.


I started with gessoing the whole thing. Then i covered both sides with washitape. Then i coloured the whole thing in blue and a spot of yellow. I have used Tim Holtz`s Mustard Seed yellow distress ink for the yellow spec and Twinkeling H2O Autumn skies for the blue hue.


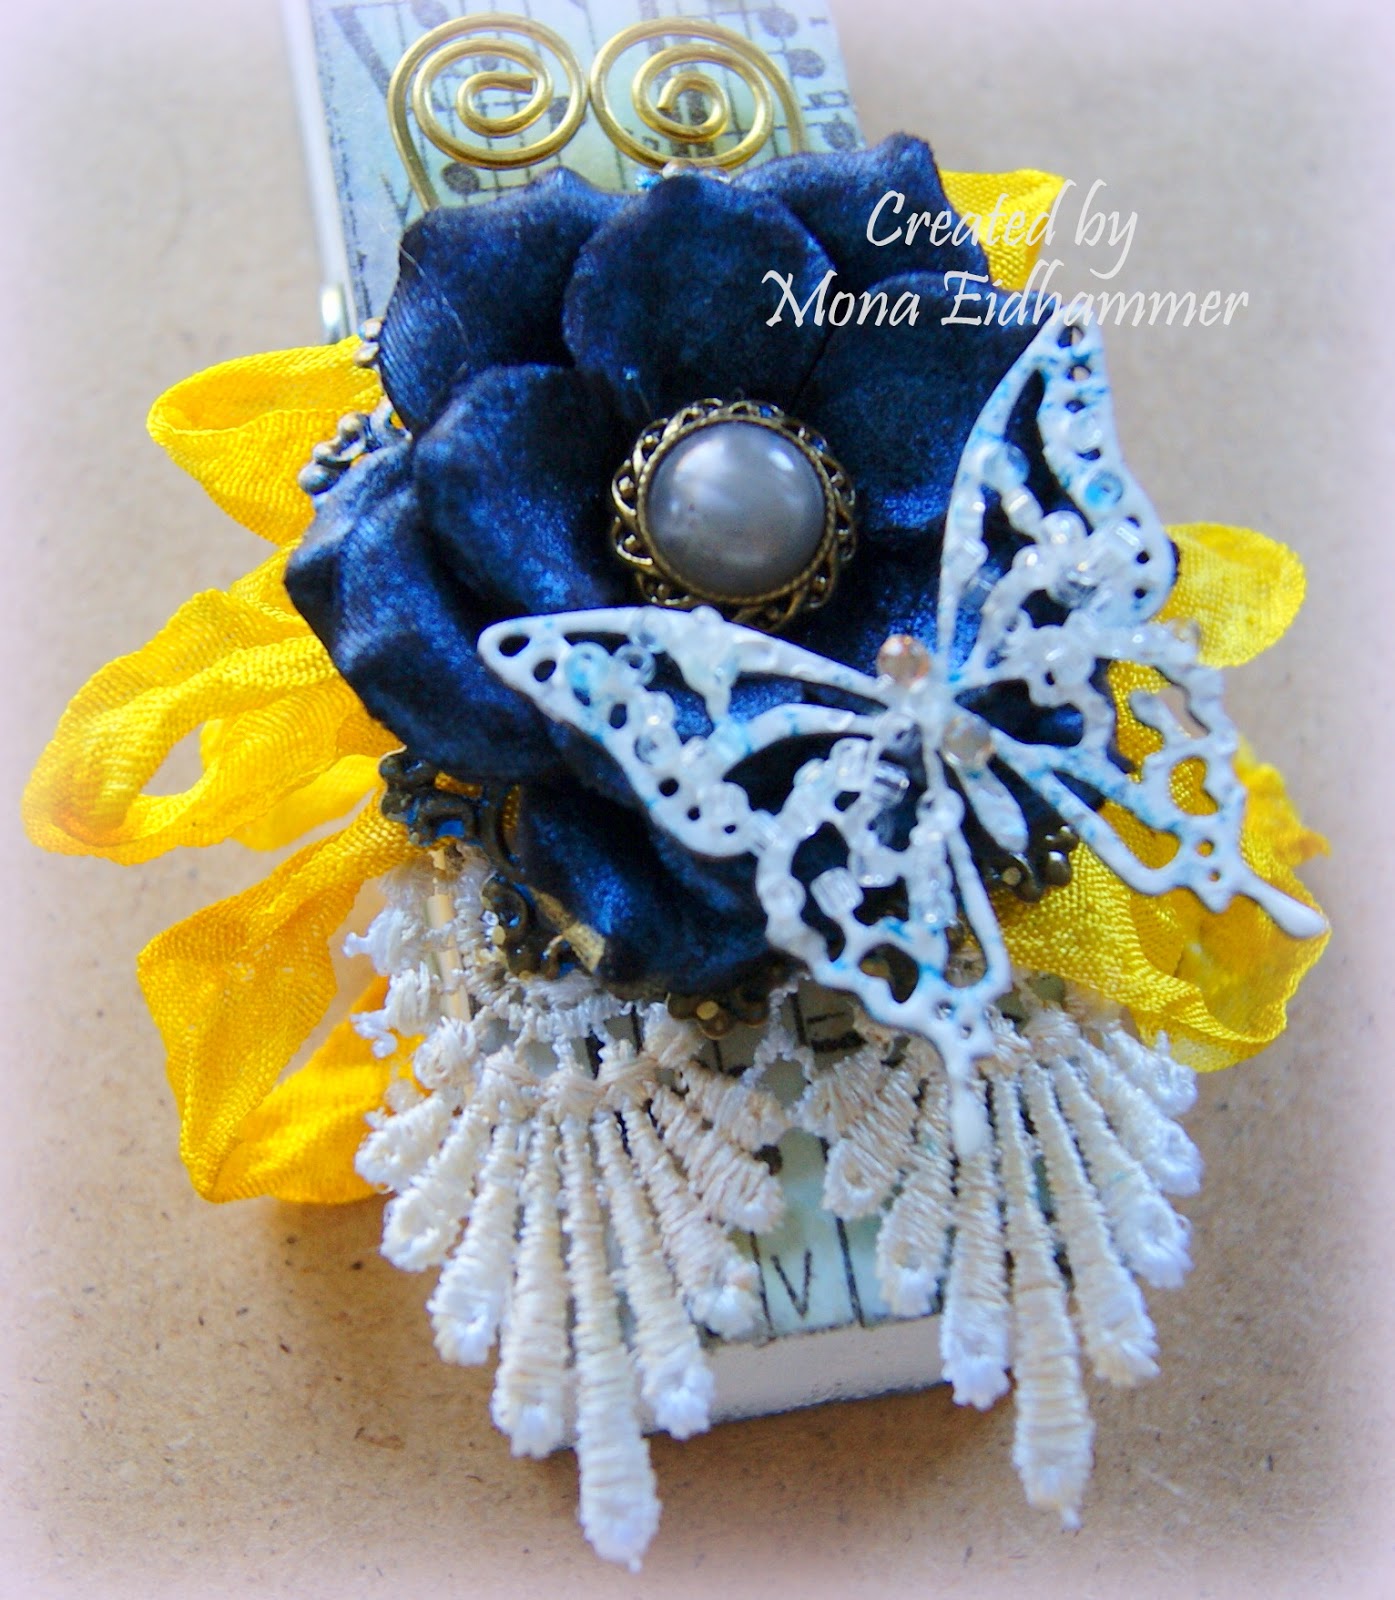
I also used the H2O to colour the Prima flower which started out completely black. I just loooove how it turned out. The seam binding is also coloured with Mustard seed Distress ink. 


I have also used a stencil from The Crafters Workshop using one of the butterflies. Created the texture with modelling paste from Prima`s Finnabair collection. I coloured it with Mustard seed and topped it with some Golden sleighbells Magicals from Lindy`s Stamp Gang. Just a tiny dash to get the shimmery look.


To finish it off i have used bling from Marianne Design, a friendship sticker from Authentic, a butterfly chipboard piece from Make it Crafty. This one i just heat embossed with white embossing and glued on some clear class beads from Prima Finnabair. Also some tiny blue specs of H2O. A metal piece under the flower, some lace and a paper clip from my stash. Oh and i almost forgot. All the edges are smeared with Black soot distress ink.


With this creation i made it through to round 2 on walk over. Later today we will get the new task for round 2. I`m so excited, lol . Hope you come back and visit me tomorrow. I will show you the card i created for round 1.

Thanks for the visit.


Sunday, November 16, 2014

Cloud Lily canvas

Hi everyone!

Mona has done something she doesn`t know how to do, lol. I`ve created my first canvas using this totally adorable Cloud Lily from Ppinkydolls


I was so scared that i was going to muck things up, but i`m so pleased with the end result. I`m just so sorry that the pics doesn`t do it justice. If i have had any idea of how much fun this would be, i would have tried this much earlier, lol. 

I`m warning you right now....this is going to be a pictureheavy post. I`m just a bit bummed by the fact that i missed the daylight and my flash killed allmost every pic i tried to take. But it will have to do.

I started to colour in the image. Cloud Lily from Ppinkydolls. Using my fabby ProMarkers and FlexMarkers. As it has been sometime without colouring i`m just starting to figure out how to use them again. I can tell you...colouring i just like fresh goods. It has to be maintained or it gets degraded after a while, lol. 

Colours i used:

Skin: Vanilla, Saffron, Oatmeal, Tan, and Sunkissed pink for cheeks.
Lips got some Coral
Hair: Aubergine, Amethyst, Winter berry, Pink Pearl
Outfit and wings: Baby pink, Pink mittens, Antique white
Cloud: Ice grey #1 trough 5
Shoes: Umber, Warm grey #2 and 4
Eyes: Azure, Cool aqua

I started with decoupaging the image to the canvas. Next i did the same thing to some paper pieces randomly placed onto the canvas. Sorry they don`t show too well. I know where they are, so i see them but i don`t think you can tell, lol.

Next up is the stencils. I used some texture paste to make some texture. I used a text stencil and a honeycomb stencil. You can see the text at the side of the canvas, on the image below. The honeycomb you can see on the first pic on the left side. For some extra texture i mixed sand in the gesso as well.


I then added some lace from my stash. I mixed my own blend of acrylic paint from white and purple. Blending it to a lavenderlooking kind of colour. Which i used painting all the sides and selected areas on the top. 

I also painted the chipboard frame with white acrylic paint. The frame is the Circle flourish chipboard frame from Make it Crafty. I don`t know if it is available any longer though. I tried to find a link to it but it seems like the shop only contains stamps now. When it had dried i glued it onto the canvas.


Next i glued on all my items of choice. I have flowers from Prima and Storyteller, Leaf from Wild Orchid Crafts. Metal embelishments from Prima and Korthobby.


When it all had dried i painted the whole thing with gesso and finally spritzed averything with mists from Lindy`s Stamp Gang. I made sure to heat-set it all between every colourchange so it didn`blend too much. I absolutely love all the shimmer. Here is the list of stuff from Lindy`s i used:

Startbursts:
Gag me with a spoon of grey
Jazzy Jivin` Purpple
Golden Lump o`cool (dark grey with gold shimmer)
Soft Water Taffy (pink)

I also used Cactus gold (Glitz spritz) and Golden sleigh bells (Magicals)


The lightbulbe (under) is from Junkyard findings by Prima. Under the flower you also can see some banners from Melissa Frances. The star on the left is also from the same company. The key is also Prima. I`m not sure but i think the heart maybe from Korthobby. If not, i`m sure you`ll help me correct it, lol.


The Resin corner is from Prima`s Shabby Chic Treasures and the bird and branch is a metal-embellishment form Korthobby.
 

For the finishing touches i added some bling, pearls and stickles glitter glue here and there. I also tuched up some small areas with the golden sleigh bells magicals from Lindy`s. And that sweet tile from Prima as the last little "must have" thingy.


Here`s a last look at this sweetie from Ppinkydolls Art. I hope you have enjoyed my little tale about this canvas. Well at least i hope i didn`t bore you to death, lol.Hope i did`t forget anything, lol. Don`t hesitate to ask me if there is something you are wondering about. I will try and help you as best as i can. 

Thanks for visiting me.

Challenges entered:

November challenge at Ppinkydolls Art over at Facebook


Monday, July 1, 2013

ProMarker Norge Utfordring #21

Heisann folkens!

Jeg har merket meg at det er rolig der ute i bloggland. Regner med at de fleste er i feriemodus og at det kreative kommer i andre rekke. Jeg har det litt sånn jeg også for tia selv om jeg ikke har gått ut i ferie enda. Vel, uansettt er det en ny utfordring på gang hos ProMarker Norge så hopp over å ta en titt da vel. Vi har en fabelaktig sponsor denne gang og vi i DT har vært så heldige å få noen riktig så lekre motiver å leke med.

Sponsoren denne gang er:
Til mitt bidrag har jeg brukt et motiv som heter Elanor painting butterflies. Er hun ikke supersøt? Jeg har også brukt chipboard hjørner fra Make it Crafty, papir og dies er fra Marianne Design. Blomster fra Wild Orchid Crafts og Kort og Godt, samt blonder fra WOC. Pynteserviett, perler og bånd fra eget stæsj. Har hatt det så lenge at jeg ikke husker hvor det er kjøpt. Seniliteten lenge leve !!!


Her er fargene jeg har brukt:

Hud: Vanilla, Saffron, Oatmeal, Sunkissed Pink, Tan
Hår: Cocoa, Mustard, Buttercup
Øyne: True blue, Sky blue, Powder blue
Kjole: Dusky rose, Budding rose, Pink mittens, Winter berry, Lavender
Sko: Umber, Cocoa, Cinnamon, Boysenberry (FM) Dusky rose, Pink mittens
Sommerfugler/malingsspann/kost: Fuchsia pink, Boysenberry (MF), Lime zest, Bright green, Ice grey #1,3,5, Cocoa, Tan
Himmel: Polar blue, Denim, Powder blue, Glacier blue (FM), Blender
Mark: Umber, Sandstone, Blender


Da er det bare å hoppe over til ProMarker Norge å finne ut hva utfordringen går ut på. Regner med å få se mange bidrag, hehe. Lykke til alle sammen!

Saturday, June 1, 2013

ProMarker Norge utfordring #19

Hallo folkens!

Regner med at dere har hatt ei travel uke. Da er det ekstra godt med ei frihelg! Så fint å kunne slappe av med litt kortlaging da!

Over hos ProMarker Norge er vi klar med ei ny utfordring. Som vanlig må du nok ta turen over for å finne ut hva utfordringen består i men det vil være verdt turen. Jentene har laget så utrolig mye lekkert!


Kortet mitt i dag er inspirert av Alyce fra Kit and Clowder. Hun lager så utrolig lekre kort med svertede kanter. Jeg har vært borte fra sverting en stund, så hun har inspirert meg til å begynne å sverte kantene igjen. Motivet er hentet fra Make it Crafty. Zoe var så snill at hun delte dette motivet med oss som en takk for at vi liker Make it Crafty. Motivet er virkelig nydelig!


Farger jeg har brukt:

Hud: Vanilla, Saffron, Oatmeal, Tan og Sunkissed pink til kinn 
Hår: Umber, Cocoa, Cinnamon, Tan
Kjole og vinger: Capri blue, Powder blue, Glacier blue (FM)
Andre: Fuchsia pink, Moss, Silver


Jeg synes det er så moro å lage disse flisene av leire. Her er enda en jeg har laget selv. Jeg har også pyntet chipboard biten. Jeg brukte først brun sverte. Deretter pyntet jeg med diamond stickles


Da er det bare å hive seg rundt lage noe til utfordringen vår hos ProMarker Norge. Gleder meg masse til å se hva dere får til. God helg alle sammen!


Monday, May 13, 2013

Pretty in pink at WhoopsiDaisy

Hey everyone!

Today we are ready with a new challenge over at WhoopsiDaisy. The theme for this week is

PRETTY IN PINK

  Here is my card for this challenge. I have used papers from Maya designs spring basics collection. I just love these course they are so light and soft coloured. Such beautiful designs. You have to excuse me a bit as i think i went a bit overboard on the photos, lol. I just have a ot to show you, lol.


The image i have used is from sheet #448 available in the WhoopsiDaisy digi shop. There is actually a freebie available if you want to play along.


The colours i have used are:

Skin: Vanilla, Saffron, Oatmeal, Sunkissed pink, Tan
Hair: Cocoa, Mustard, Buttercup
Dress: Pink carnation, Carnation, Pink mittens


This lace butterfly is from Wild Orchid Crafts. I just looooove it!


I have also tried out the new Frantage embossing enamel which has become so popular recently. I think it gives a fabulous distressed look. The colour i have used on this card is the Aged Rose enamel. It is available at Live and Love Crafts. The Chipboard pieces are from Make it Crafty.


I have also made this tile myself. I have used white clay, rolled it flat and cut out the size i wanted. Baked it in the oven for half an hour to make it hard. Then i glued a piece of a scrap paper with this cute image on to it. Then sanded the edges a bit. At the end i sealed it with glossy accent on top to give it a glossy look. Hope you like it as much as i do, lol.


Finally a big cluster of flowers. These are from Prima, Wild Orchid Crafts, Mulberry Crafts and Kort & Godt.


Thanks so much for visiting me. I really appreciate it. I hope to see you over at WhoopsiDaisy. Please come join us for this challenge. Everyone loves pink, so this should be a nice and easy one.
Happy crafting!

Challenges entered:

Great Impressions - Celebrations
Order of the Opus Gluei - Bouquet
Pan Pastel - In the pink
Pile it on - For a teen
Scrappy Frogs - Free Choice Challenge
Fashionista Challenge - Shabby or vintage


Monday, April 15, 2013

Not square at WhoopsiDaisy

Hi everyone!

It`s monday and we`re doing the ususal deets over at WhoopsiDaisy. New challenge that is, lol. The theme set is: 

NOT A SQUARE CARD


For my creation this time i have made a circle card with lots of layers. I have used an image from sheet #431. I think she is soooo adorable.


Colours i have used:

Skin: Vanilla, Saffron, Oatmeal, Sunkissed pink, Tan
Hair: Cocoa, Mustard, Buttercup
Dress: Celestial blue (FM), Powder blue, Glacier blue (FM)
Wings: Lime twist, Lime zest, Aniseed (FM)
Flowers/grass: Coral, Pink mittens, Forest green, Pear green, Chartreusse (FM)
Mushroom: Tan, March hare, Satin, Shale, Burgundy, Berry red
Ground: Umber, Sandstone, Blender
Shade: Midnight blue, Twilight sky, Denim blue, April shower, Blender.


The big flower is from Prima, The Chrysanthemums and rosebuds are from Kort & Godt. Pearls and the last little flower is from Wild Orchid Crafts. I also made a little glasspebble using a little image from a Graphic 45 piece of scrap paper. You can barely see it in the bottom of the flower cluster. Papers i have used are the new Vintage spring basics by maja design.


I have also used a freebie sentiment from Kristin Langnes, available here.


Not too long ago i saw this tutorial on how to make extra texture to your paint. There was this fabulous lady that had this tutorial but i really don`t remember her name right now. If anyone know who i`m talking about please let me know so i can give her credit. Well...anyway, she put some sand in her acrylic paint to make some extra texture. I had to give this a try and you can see it around the edges and on the keyhole and the butterflies. The only difference i used gesso instead of acrylic paint. I had so much fun and i just looove how it turned out.

Well, that`s it. Just stay tuned course i`ll soon be back with a post on the new challenge at Marianne`s Design Divas. In the meantime you can allways pop over to WhoopsiDaisy challengeblog and join in on the fun. Thanks for visiting!

I`ll be back! :-)


Monday, March 18, 2013

Punch it out at WhoopsiDaisy

Good morning peeps!

It`s monday morning and we are ready with a new challenge over at WhoopsiDaisy. The theme this time is:
Punch it out. 


For my card today i have used an image from sheet #418. The punched butterflies are from a Martha Stewart punch.


Colours used are:

Skin: Vanilla, Saffron, Oatmeal, Sunkissed pink, Tan
Hair: Cocoa, Mustard, Buttercup
Top: Pumkin, Gold, Sunflower, Canary
Trousers: Rose pink, Baby pink, Pink mittens
Shoes: Cocoa, Caramel, Tan
Background: Grey Squirrel, Warm grey#1, Almond, Satin, Muted pink


Flowers are from Wild Orchid Crafts as well as the ribbon and lace. All papers are from Bearly Mine Designs. And dies are from Spellbinders and Memorybox.

Below you can check out my new gorgeous chipboard corners which i have ordered from Make It Crafty. I was so surprised when i recieved it. I had anticipated it would take at least 14 days to get it, but the mail service has really done a fast and great job. It only took 8 days from Australia to Norway. 


I painted it with gesso and put on some stickles chrystal. Isn`t it beautiful? Well, i love it anyway, lol.

Thanks for visiting me today and i hope to see you over at WhoopsiDaisy

Challenges entered:

Fashionista Challenge - Make it pink
Crafts and Me - Ribbon and Lace
Divas by Design - Put on some pink
 House of Gilli - Anything goes with flowers and/or ribbon
One stop craft challenge - Anything goes
Really Reasonable Ribbon`s Ramblings - Flowers and ribbon
 Stamp with fun - Anything goes


Friday, January 25, 2013

Make it Crafty

Hi Peeps!

It`s been a really long time since i`ve had the time to create something besides my DT samples. It feels so great to be able to create without having a deadline hanging over my head, lol. I have a LOOOOT of images i haven`t had the opportunity to use earlier, so here we go with my first one for the time being.

I have used an image from Make it Crafty. She is called Ashlyn and is available here.


The backing paper is a digi paper from Astrid`s Artistic Efforts. She is the most generous lady, sharing her designs with us, so hop on over to her and take a peek at all the brilliant designs. Thanks for sharing Astrid!


Colours i have used:

Skin:
Vanilla, Saffron, Oatmeal, Tan, Sunkissed pink

Hair:
Walnut, Terracotta, Spice

Dress:
Pink Mittens, Pale pink, Muted pink (FM)


Hope you enjoyed my creation.

Challenges entered:

ProMarker Norge - #3 Colour in soft shades a`la shabby chic
Lady Anne`s - Anything goes
Digistamps 4 joy - Anything goes
I love ProMarkers - Anything goes
The Paper Shelter - Anything goes
Bunny Zoe`s Crafts - Anything goes


Related Posts with Thumbnails